 Gleeo Time Tracker
Create domains, projects and tasks
Gleeo organises your time in three levels. A domain groups projects, for example everything for one company or everything private. A project stands for an order or a client, a task for the activity within it. Time is always recorded on a task.
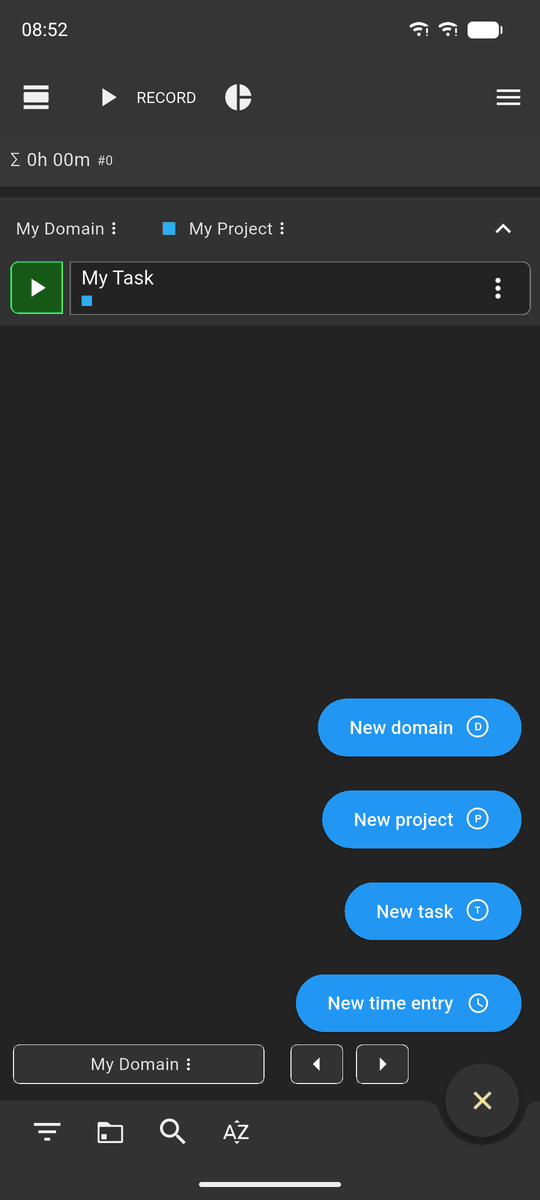
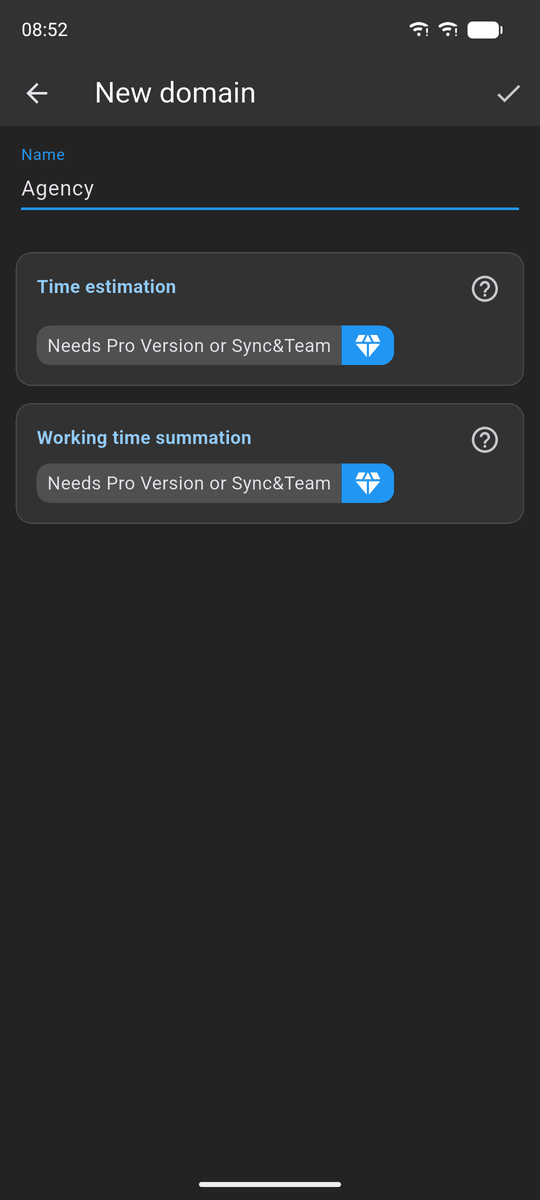
On first start, the app creates My Domain with My Project and My Task. You can rename them via the three-dot menu next to the name, or create your own: in the RECORD view, via the plus at the bottom right.
 Enlarge image
 Enlarge image
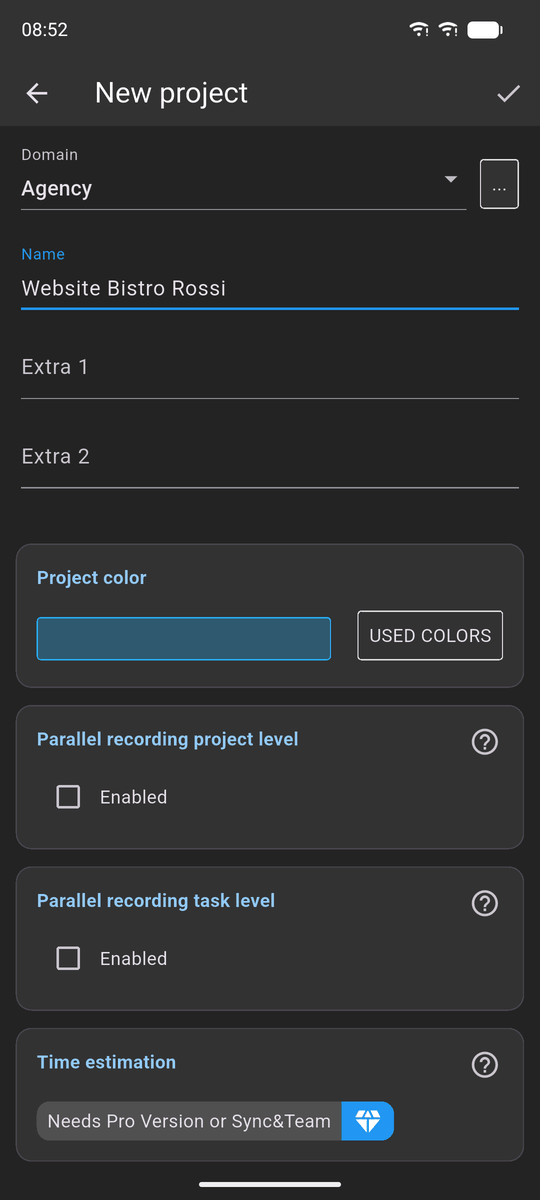
A new project goes into the domain shown at the top of the dialog. The colour marks the project in all views; Extra 1 and Extra 2 are free fields, for an order number for example, that can be included in the CSV export.
Normally every new recording stops the running one. Parallel recording project level lets a task of this project run without stopping recordings in other projects. Parallel recording task level allows several recordings at once within the project.
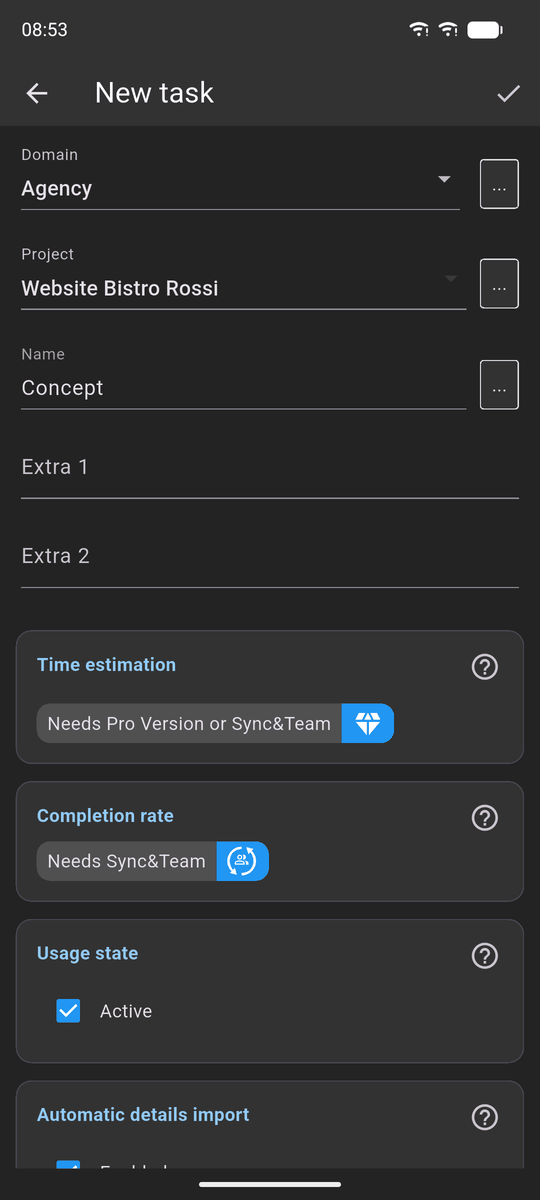
After saving, an empty task ? is waiting in the project. Tap it and give it a name. You add further tasks via New task.
 Enlarge image
 Enlarge image
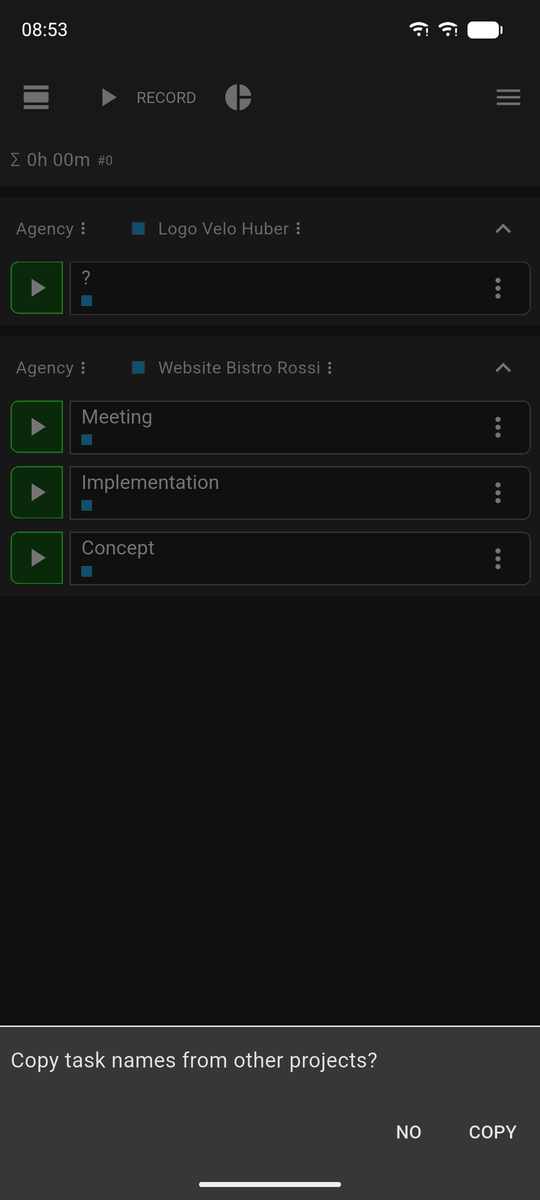
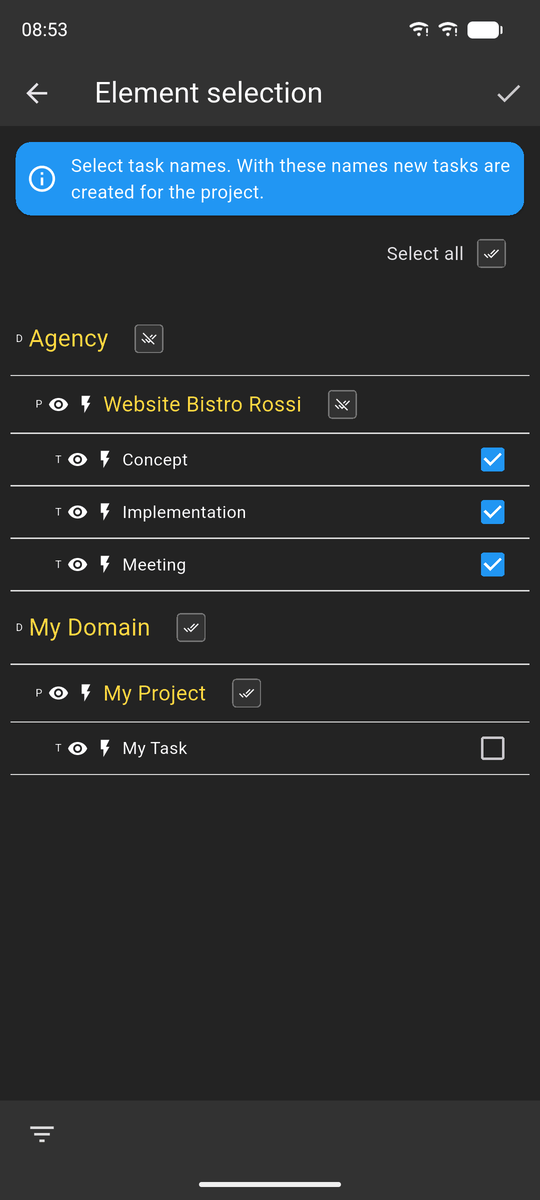
If there are other projects already, the app asks: Copy task names from other projects? With Copy you choose which tasks the new project gets as well. This saves typing when your projects are structured the same way.
 Enlarge image
 Enlarge image
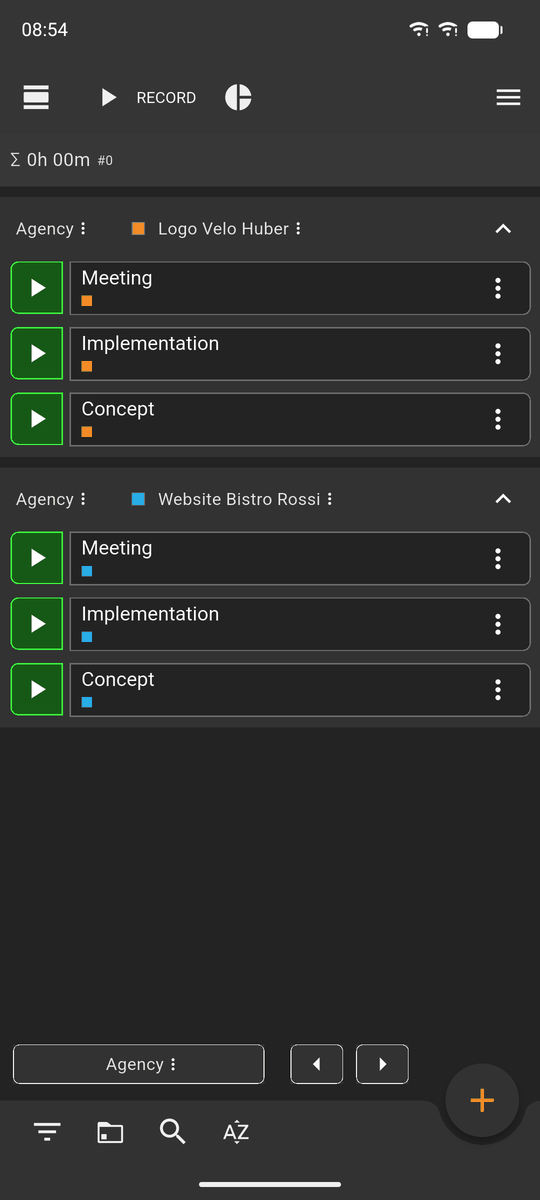
The result: the RECORD view shows each project with its tasks. Whatever you no longer need, you hide via the menu of the project or task – nothing is deleted.
 Enlarge image
Record time
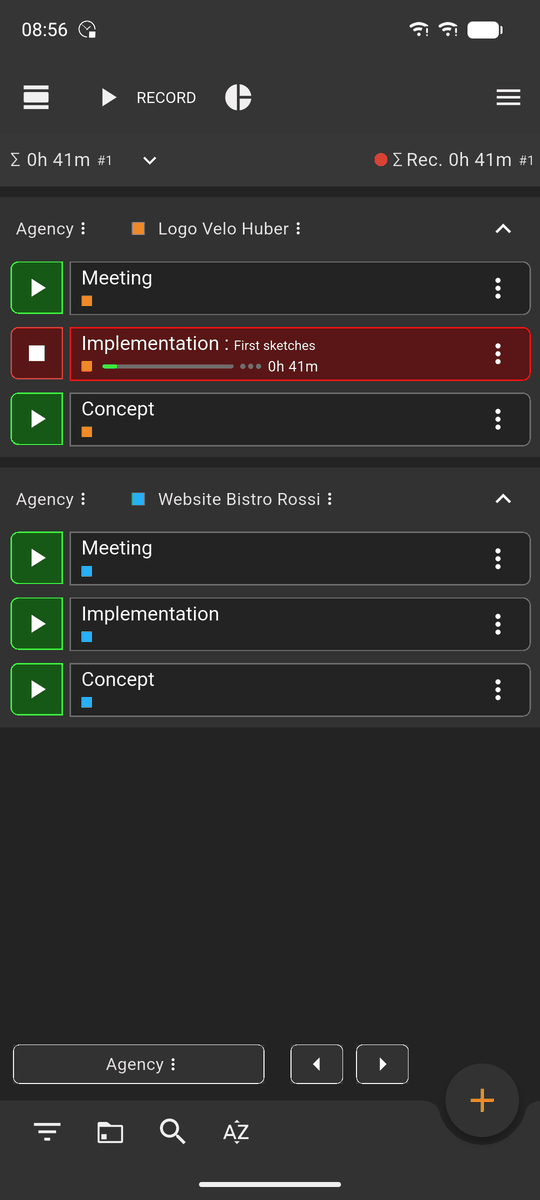
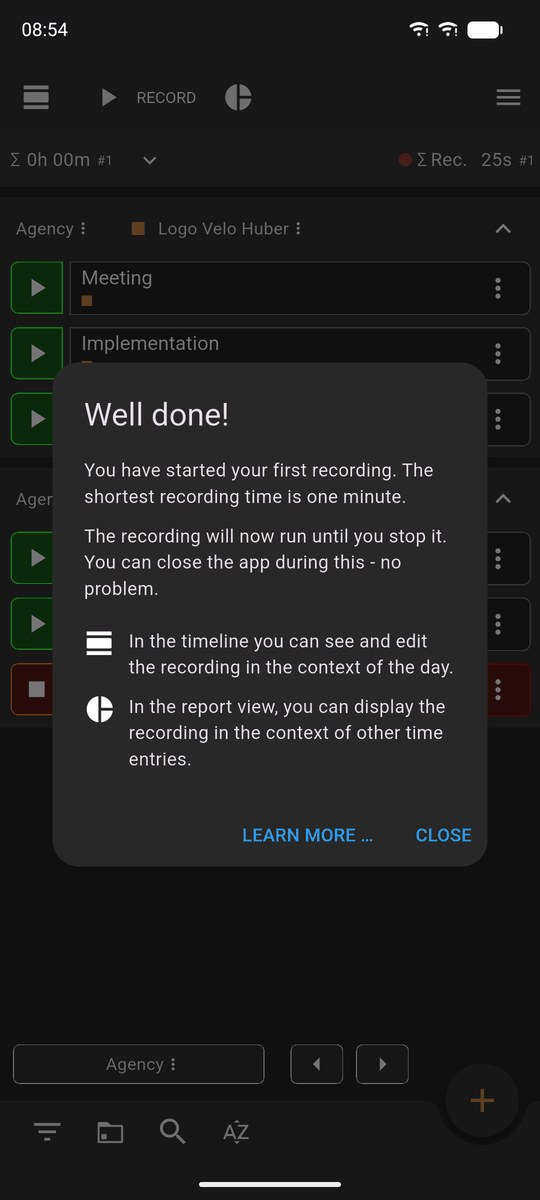
Tapping the green triangle in front of a task starts the recording. The task then gets a red outline, and the duration runs below it. Tapping the red square stops it again. At the top you see the day's total and, next to the red dot, that of the running recordings.
The recording keeps running even if you close the app. The app discards recordings shorter than one minute; this limit can be changed in the settings. If you start another task, the running recording stops by itself – unless you have switched on parallel recording for the project (see above).
 Enlarge image
 Enlarge image
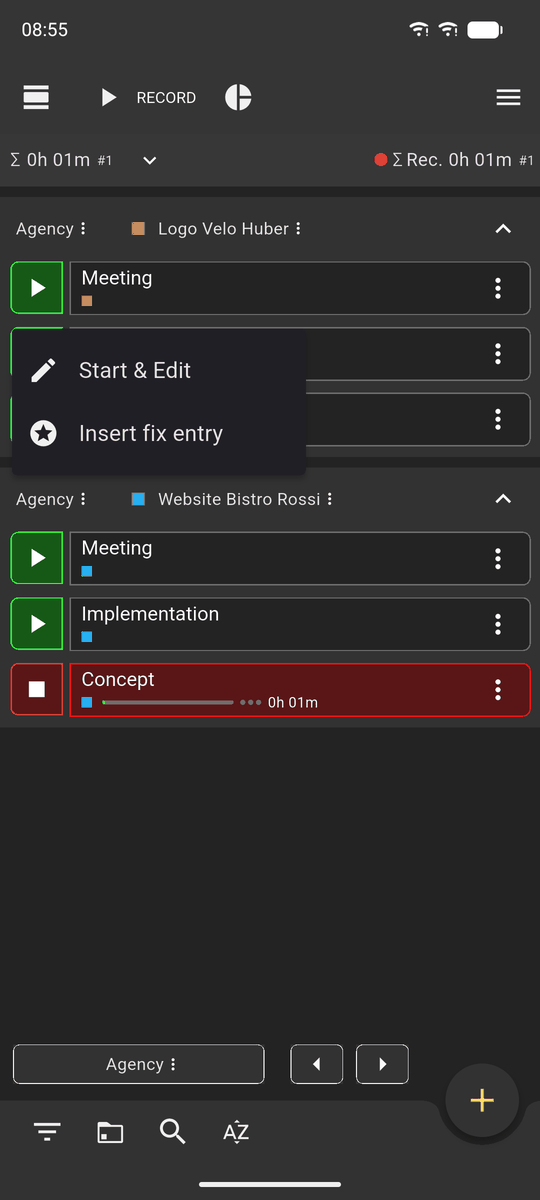
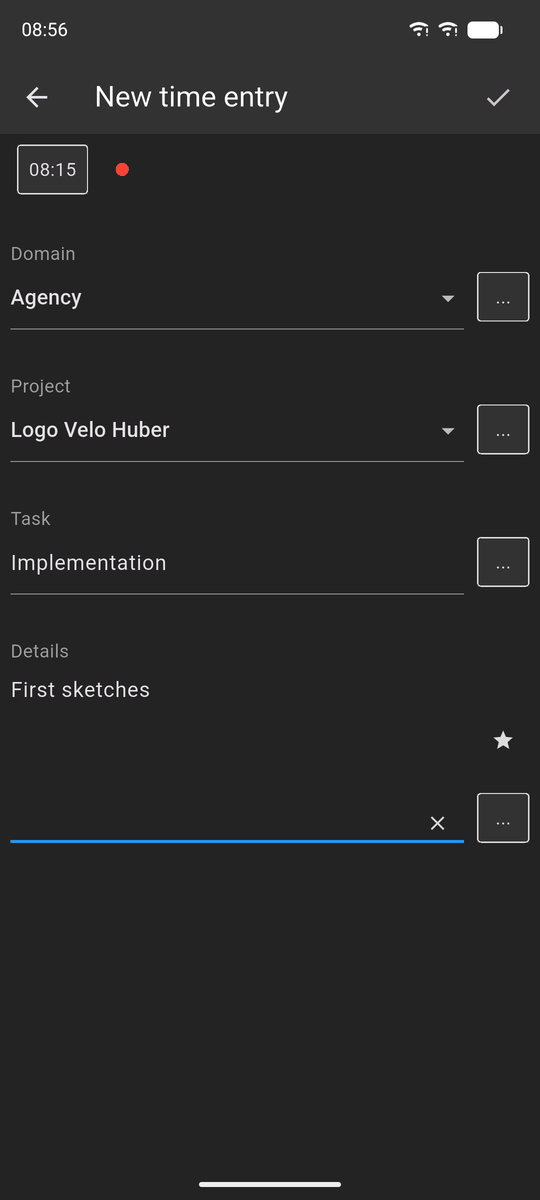
Missed the start? Press and hold the green triangle and choose Start & Edit. The recording starts right away, and in the dialog you can set the start time back and add a details text, such as what you are working on.
 Enlarge image
 Enlarge image
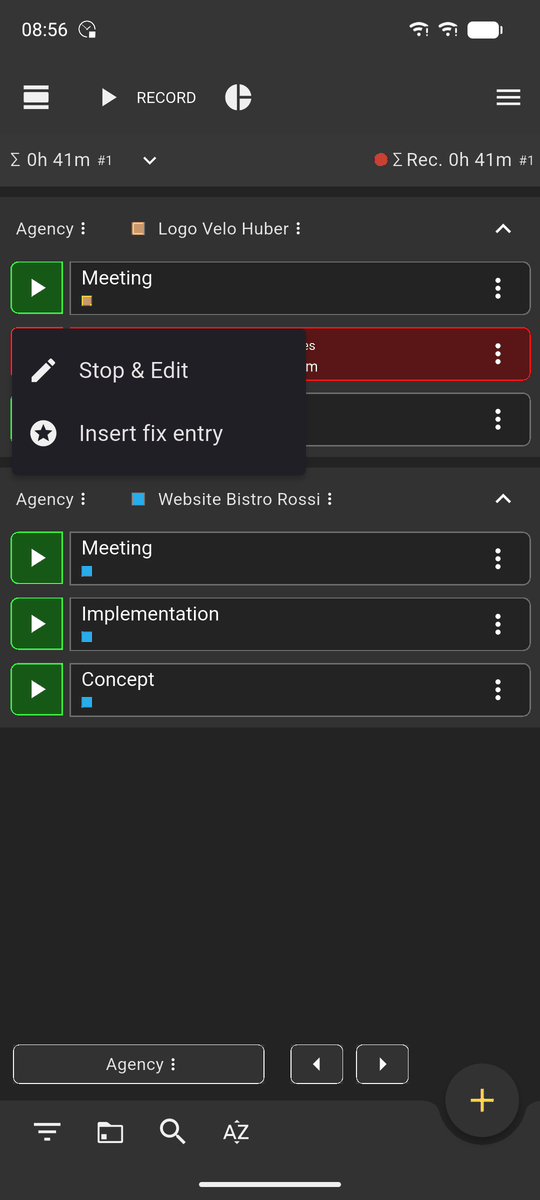
Likewise when stopping: a long press on the red square offers Stop & Edit. This stops the recording and opens the entry, for example to adjust the end time. The arrow next to the day's total expands the day's entries, with edit and delete.
If a recording runs past midnight, the app splits it into one entry per day.
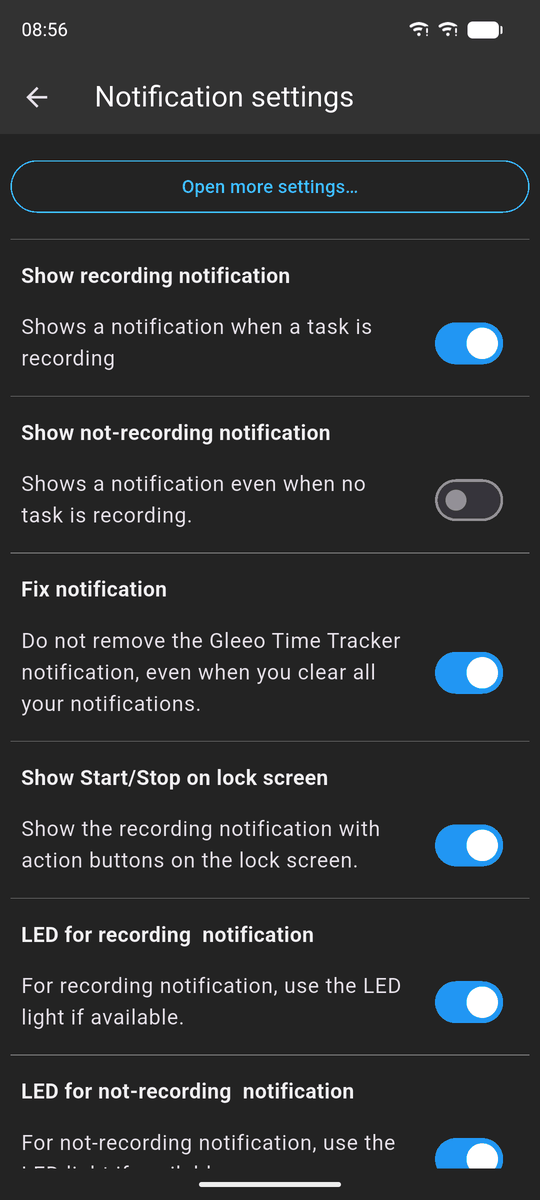
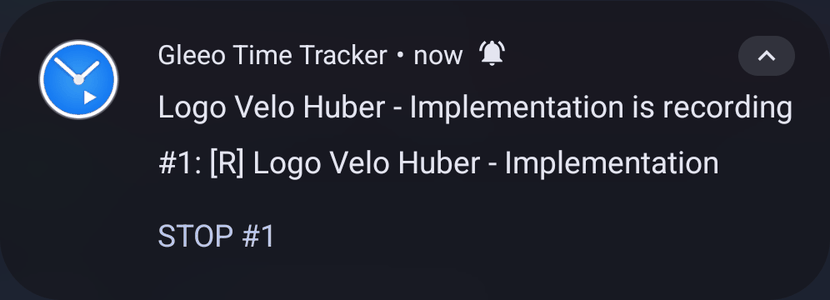
With the recording notification you start and stop without opening the app. It is switched off initially: menu at the top right, Settings, Notification…, then Show recording notification. It appears from the next recording on. On Android it offers buttons to stop the running tasks and to start the most recently used ones; on iOS it shows what is recording.
 Enlarge image
 Enlarge image
 Enlarge image
Add and edit time entries afterwards
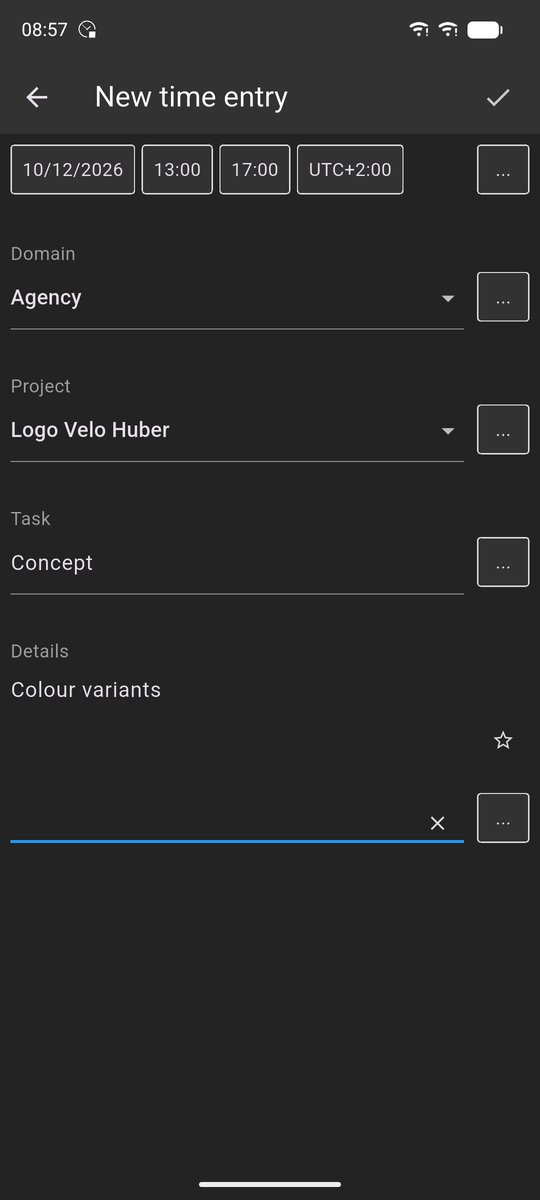
Forgot to record? Choose New time entry via the plus at the bottom right – in the RECORD view as well as in the TIMELINE. At the top are date, start, end and time zone, below them domain, project, task and details. The most recently used task is preselected; choose another one via … next to the task.
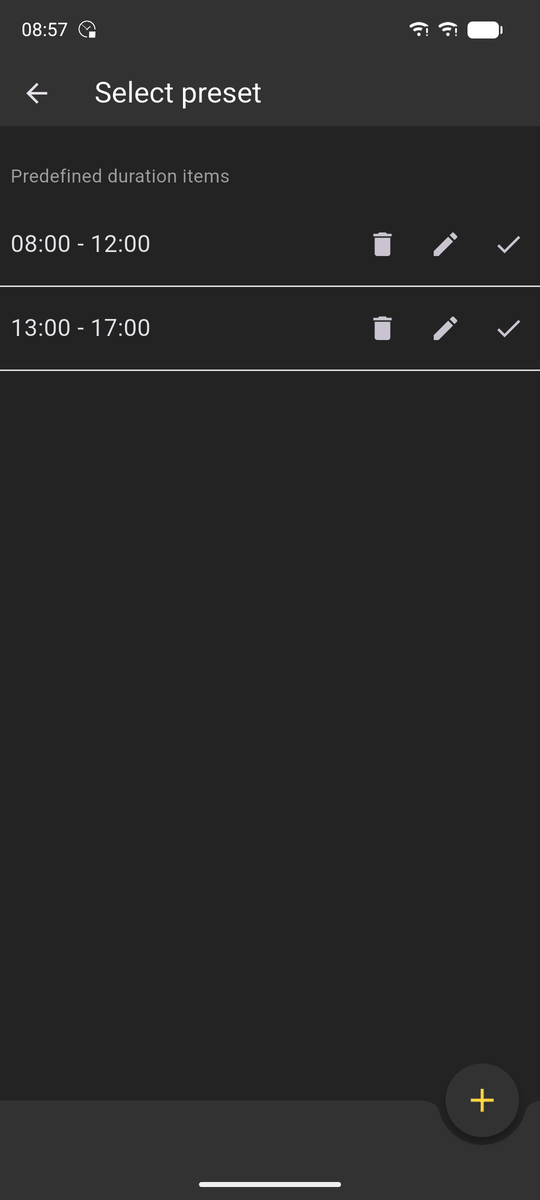
The … next to the times opens Select preset: fixed periods such as 08:00–12:00 or 13:00–17:00 that set start and end in one go. The presets can be changed and extended via the plus. The … next to the details offers previously entered details texts for selection.
 Enlarge image
 Enlarge image
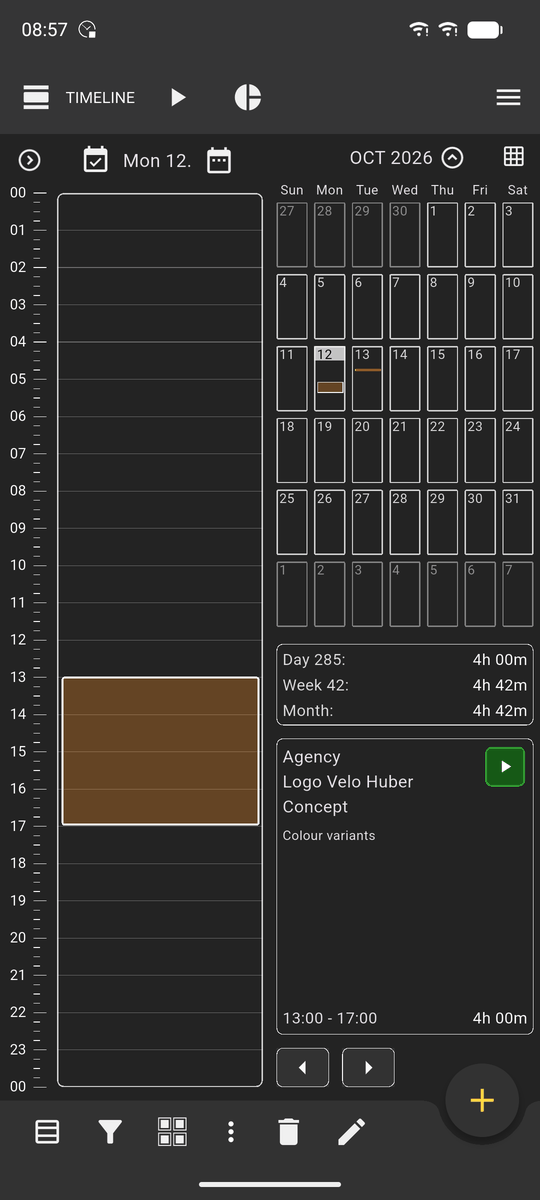
Editing is easiest in the TIMELINE, the icon at the top left. On the left the selected day is shown as a column, each entry as a block; on the right the month, the totals for day, week and month and the selected entry. Tapping a day in the month or a block selects it, the arrows jump to the previous or next entry. At the bottom are edit (pencil) and delete.
If the end is before the start, the app assumes an entry past midnight and offers to split it into one entry per day when saving.
 Enlarge image
 Enlarge image
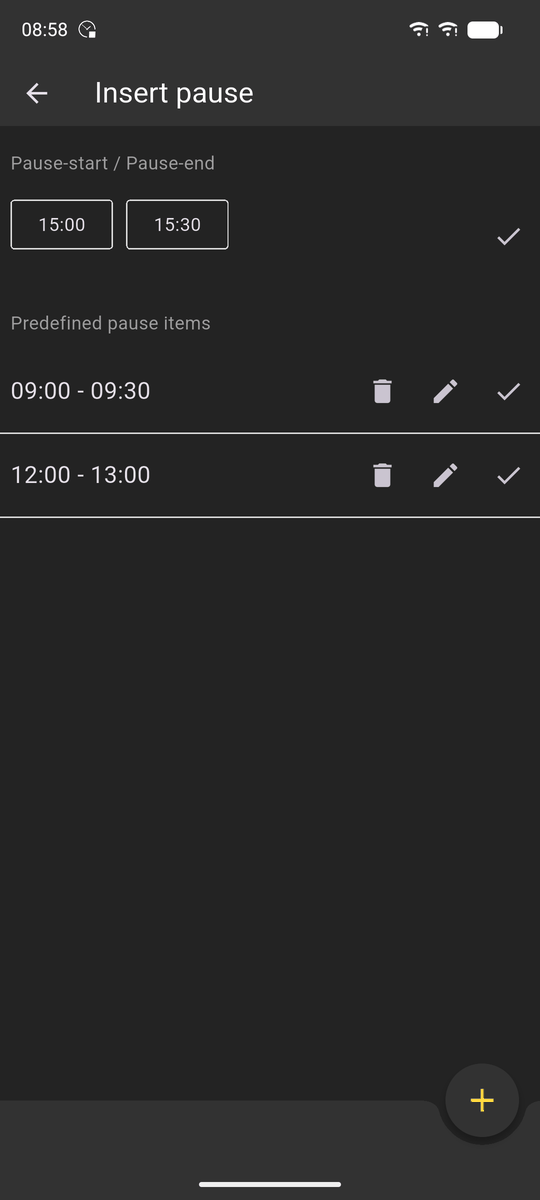
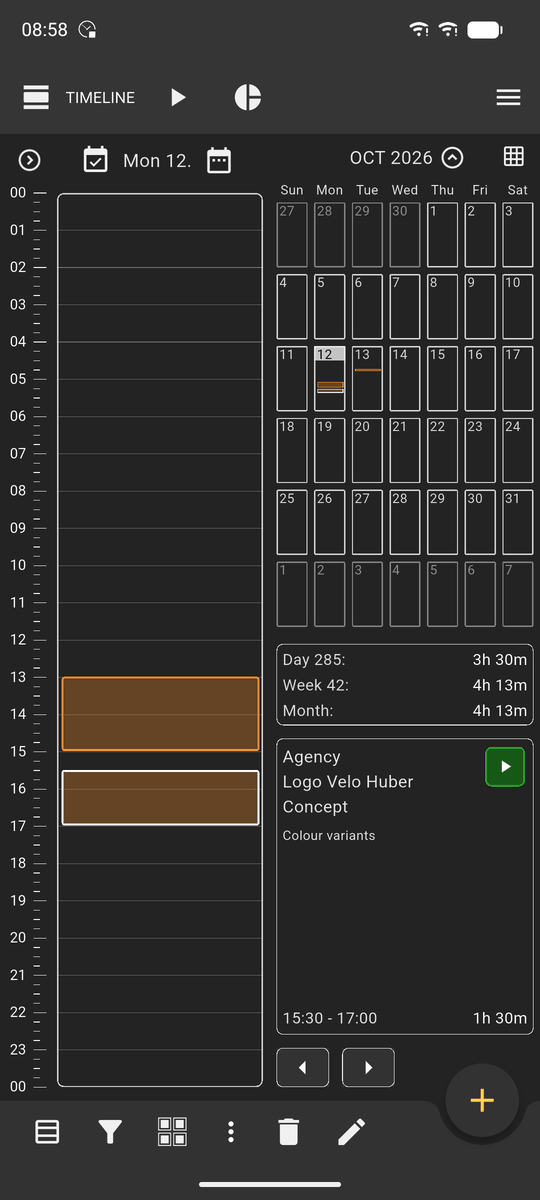
Forgot a break? The plus in the TIMELINE also offers Insert pause. After confirming, the app removes the period from all entries of that day; an entry running across it is split in two. Common breaks such as 12:00–13:00 are available as presets.
 Enlarge image
Analyse
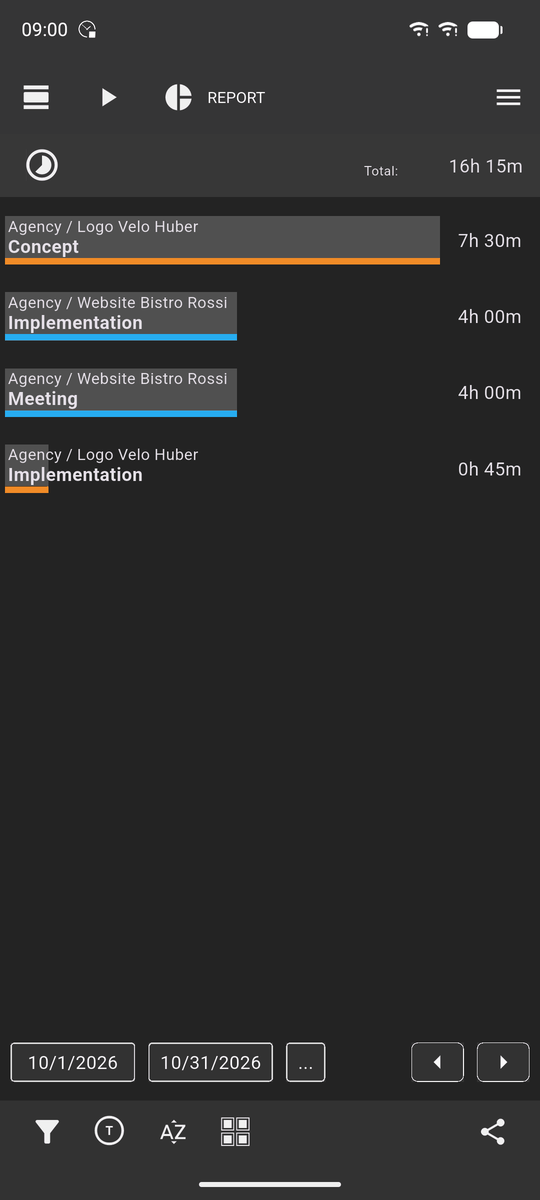
The REPORT view, the circle icon at the top, adds up the time for a period. Each row is a task, project or domain, with the total above; the bar shows the share in the project's colour. The current month is preset.
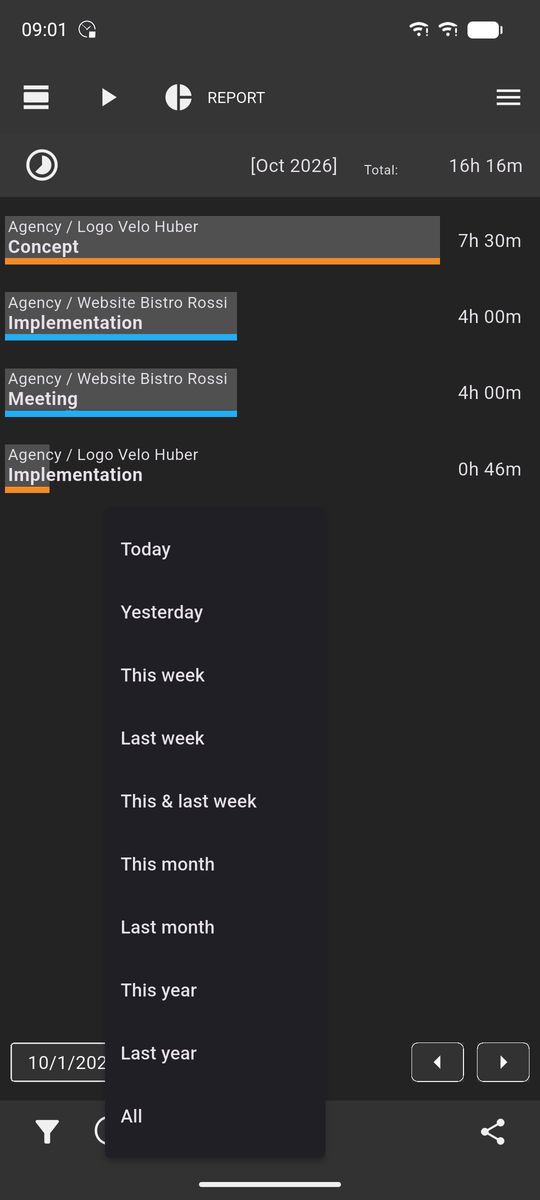
Set the period with the two date fields at the bottom or via … with ready-made periods such as This week, Last month or This year. The arrows next to them move one period back or forward.
 Enlarge image
 Enlarge image
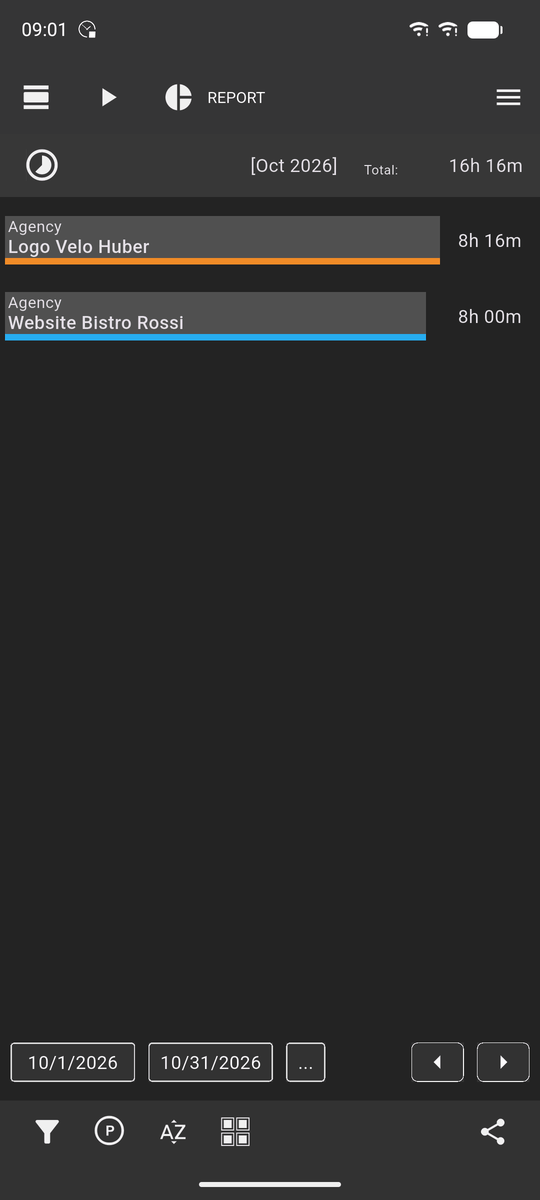
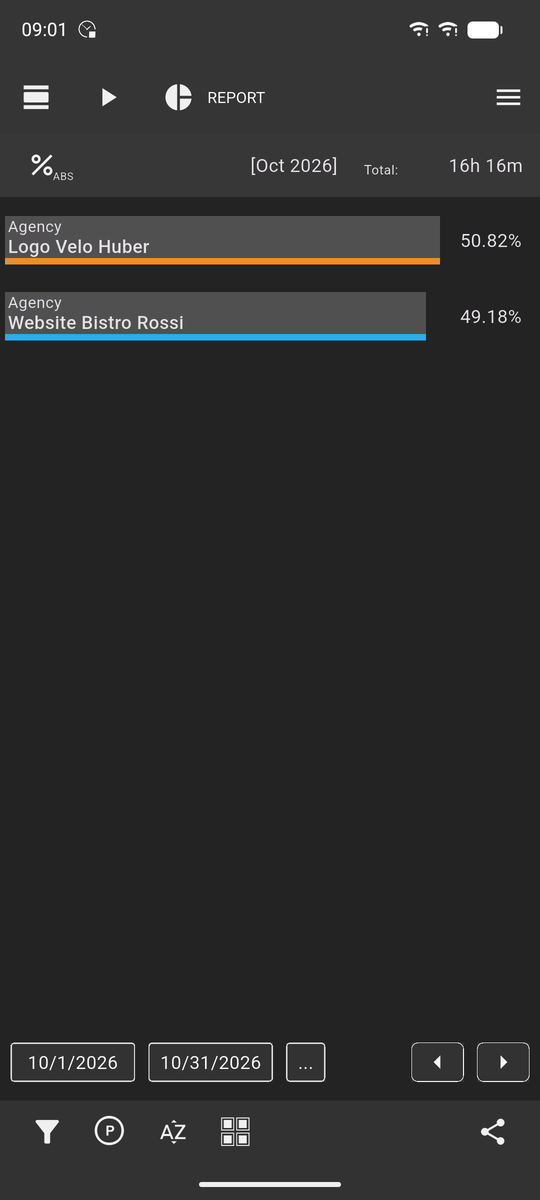
The letter button at the bottom changes the level: T for task, P for project, D for domain. The icon at the top left switches between hours, percentages and the number of entries. The funnel filters by names and details, and the grid icon limits the report to the elements that are visible or selected in the RECORD view.
 Enlarge image
 Enlarge image
Pass on what is shown via the share icon at the bottom right, as text or as a CSV file – more on this in the next step.
Export and back up
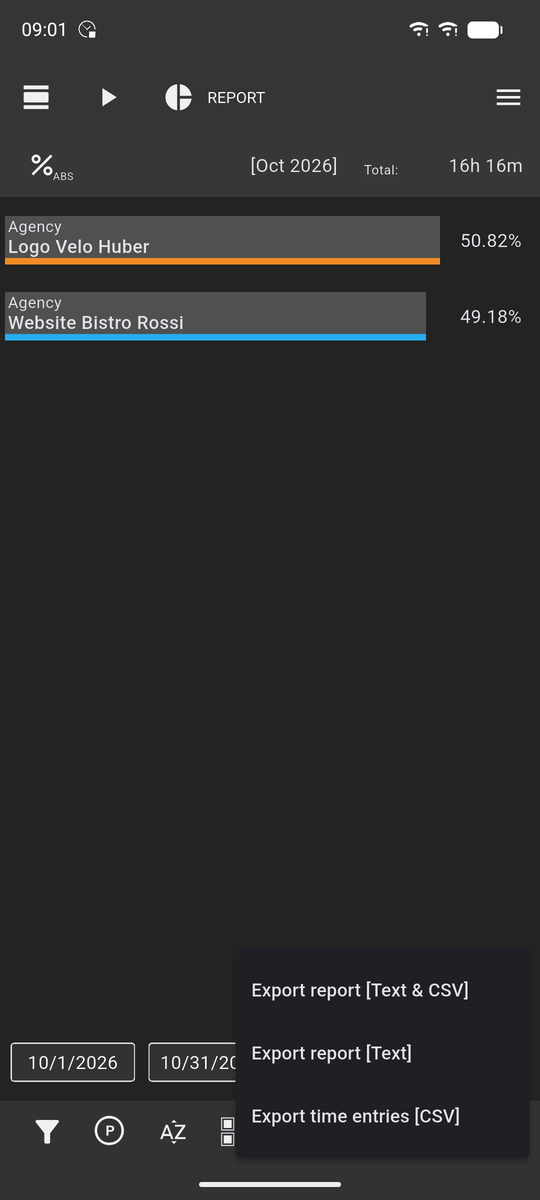
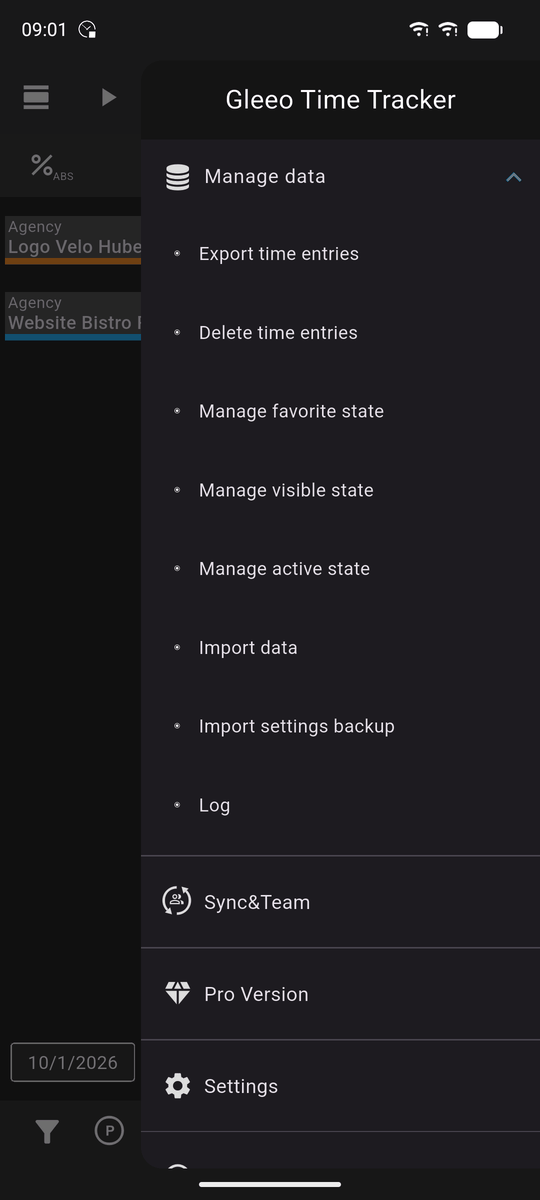
There are two ways to pass data on. In the REPORT view, the share icon at the bottom right exports what is shown: Export report [Text & CSV], Export report [Text] or Export time entries [CSV]. All time entries of a period are reached via the menu at the top right, Manage data, Export time entries.
 Enlarge image
 Enlarge image
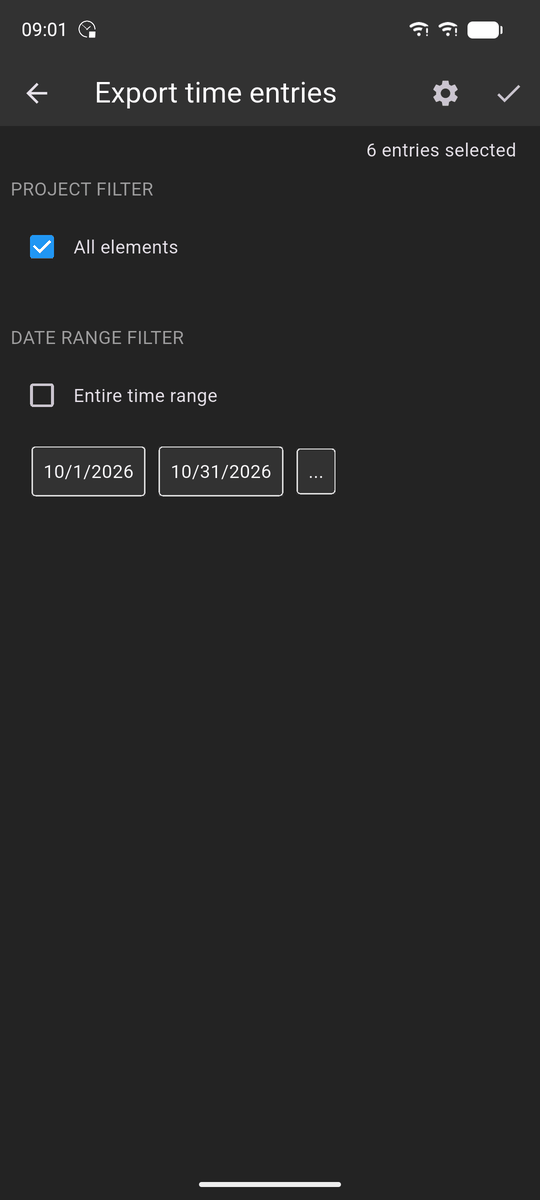
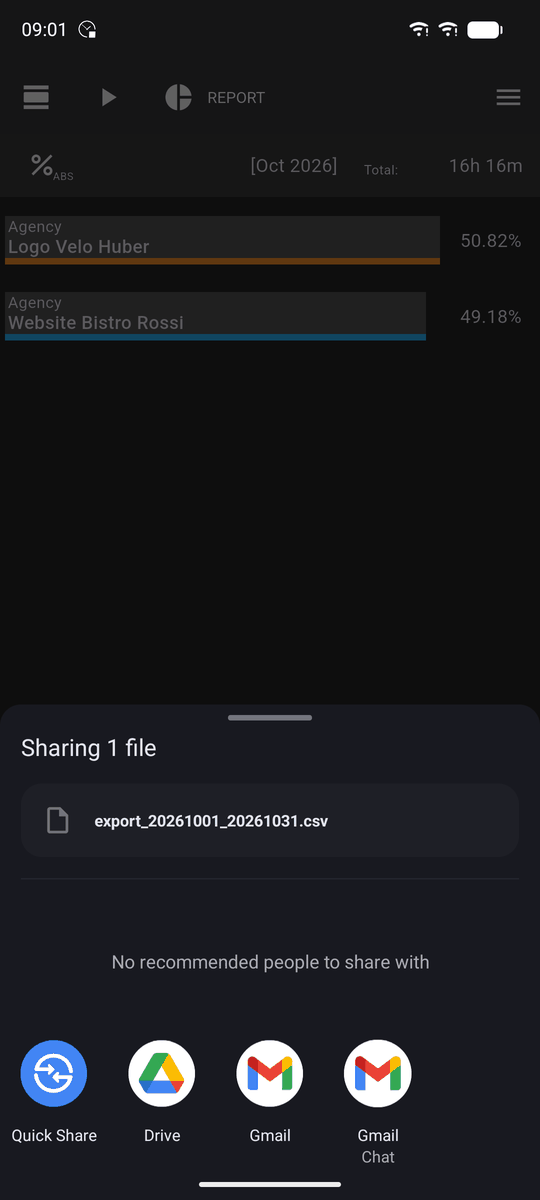
In the dialog you narrow down the projects and the period; the number of entries is shown at the top. The gear opens the export settings, such as the delimiter or date and time in separate columns. The tick creates the CSV file, and Android asks where it should go – to your email program, to Google Drive or to another app.
 Enlarge image
 Enlarge image
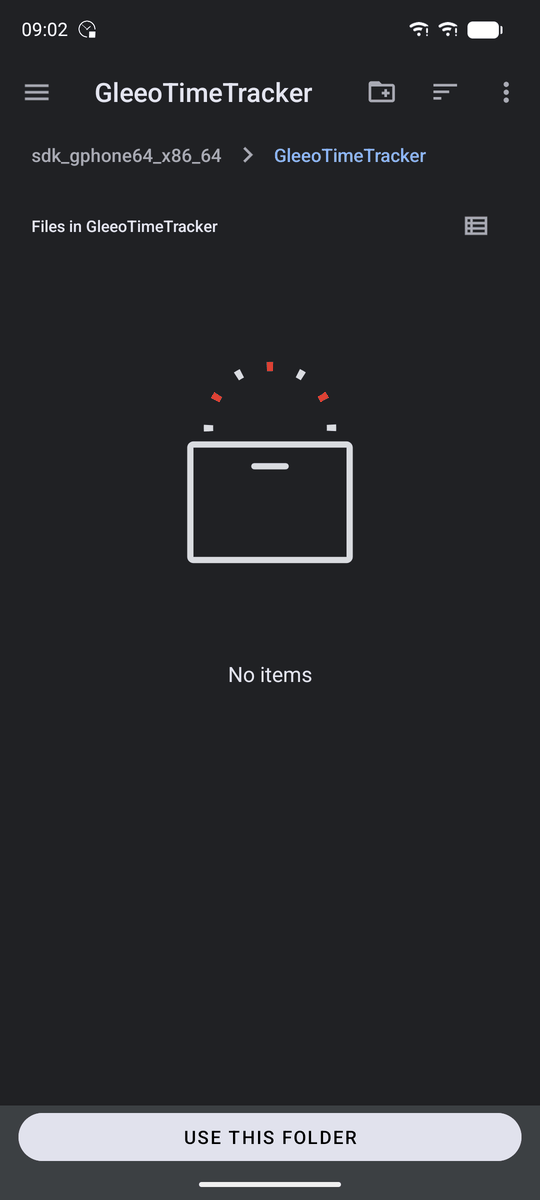
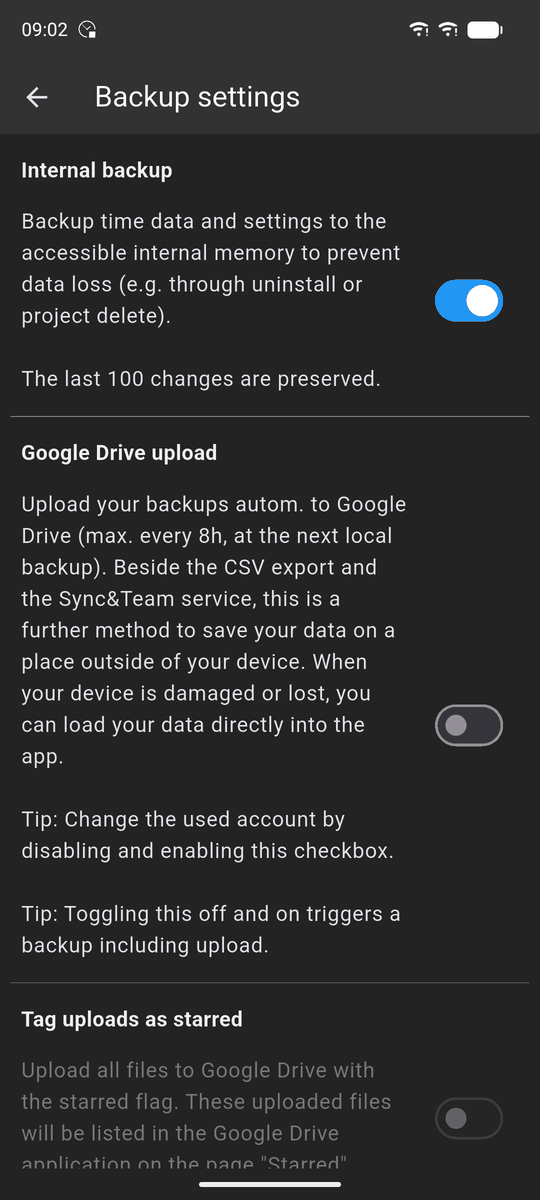
To protect against data loss, switch on Internal backup under Settings, Backup…. On Android you choose a folder the app may write to; the easiest is to create the suggested folder GleeoTimeTracker. The app stores the time data and the settings there and keeps the last 100 versions. The folder survives uninstalling the app.
 Enlarge image
 Enlarge image
So that the backup also survives a lost phone, Google Drive upload additionally uploads it to your Google Drive at most every eight hours. Sync&Team domain passwords are deliberately not backed up – write them down separately.
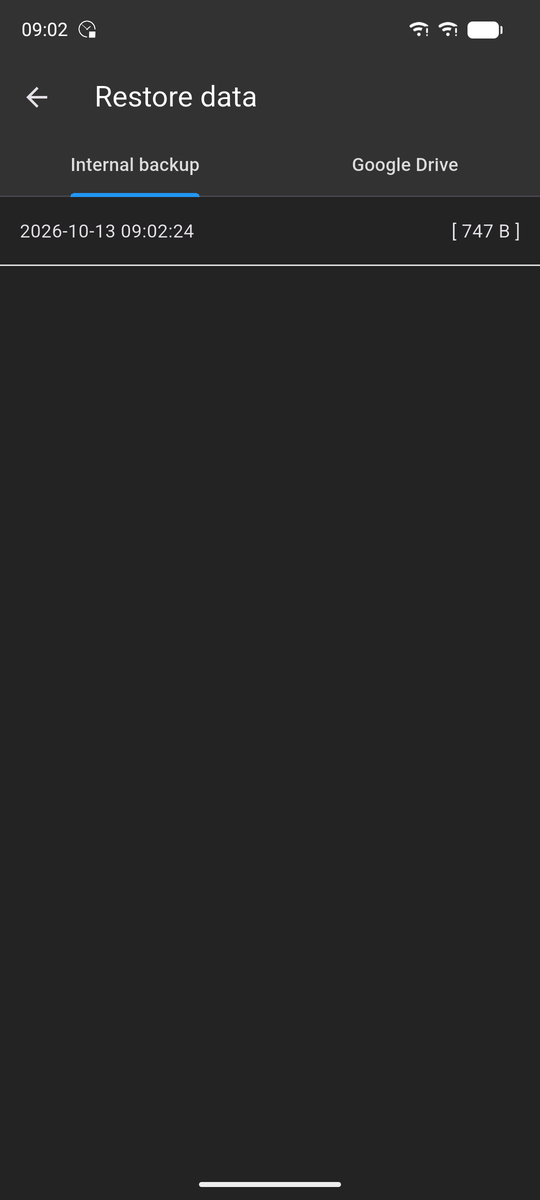
A backup is restored under Manage data, Import data: the list shows the internal backups and, on the second tab, those in Google Drive. Tapping an entry imports it.
 Enlarge image
Working in other time zones
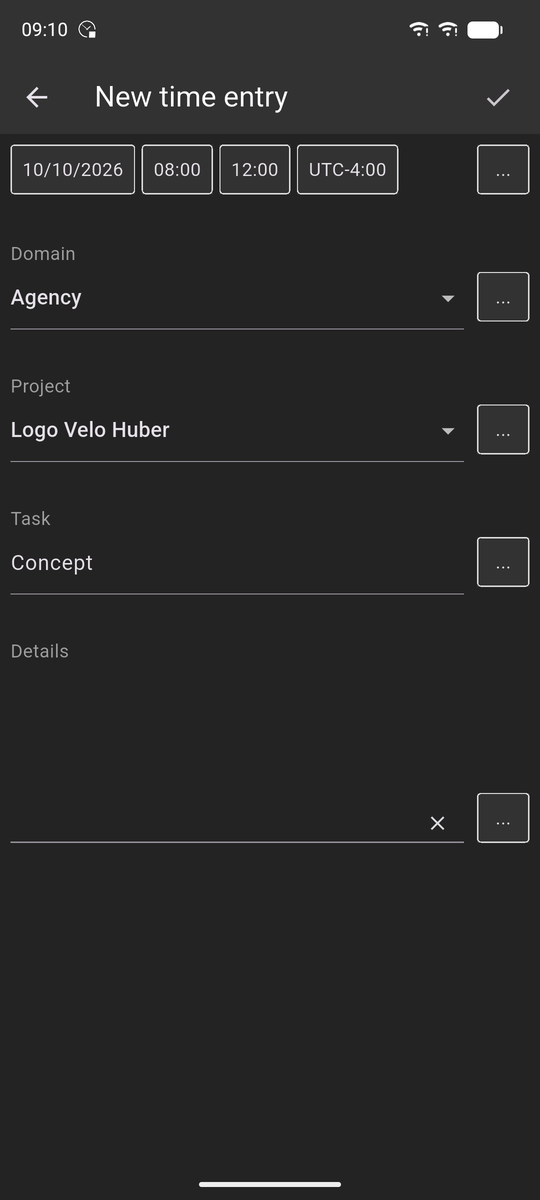
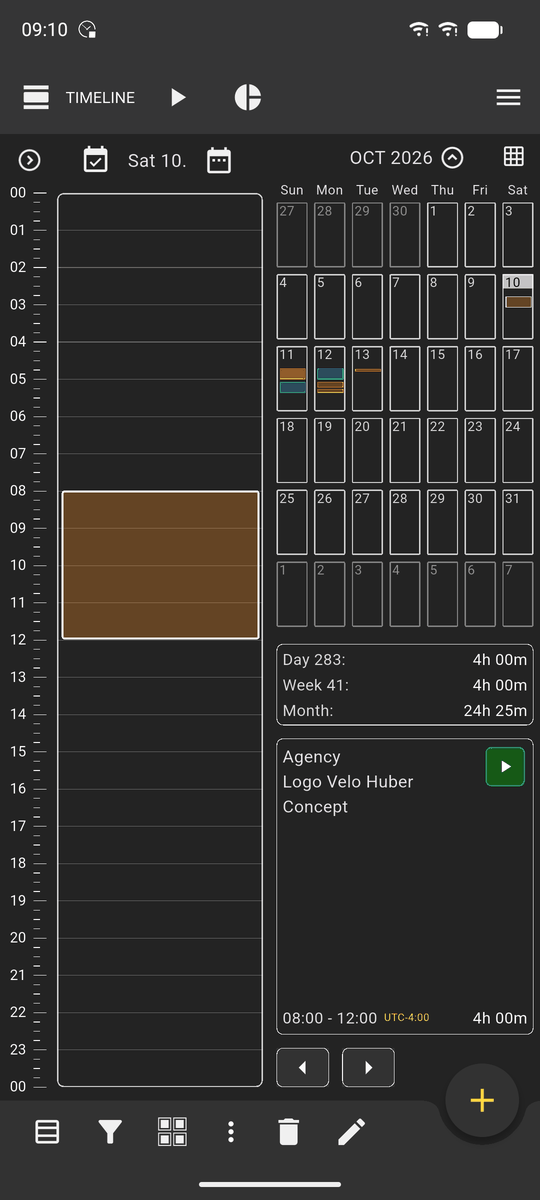
Besides start and end, every time entry stores the time zone it was recorded in. The app therefore always shows it in the local time of the day: if you worked in New York from 08:00 to 12:00, you still see 08:00–12:00 back in Zurich, with the note UTC-4:00 next to it. This way you can tell at what time of day the work was done.
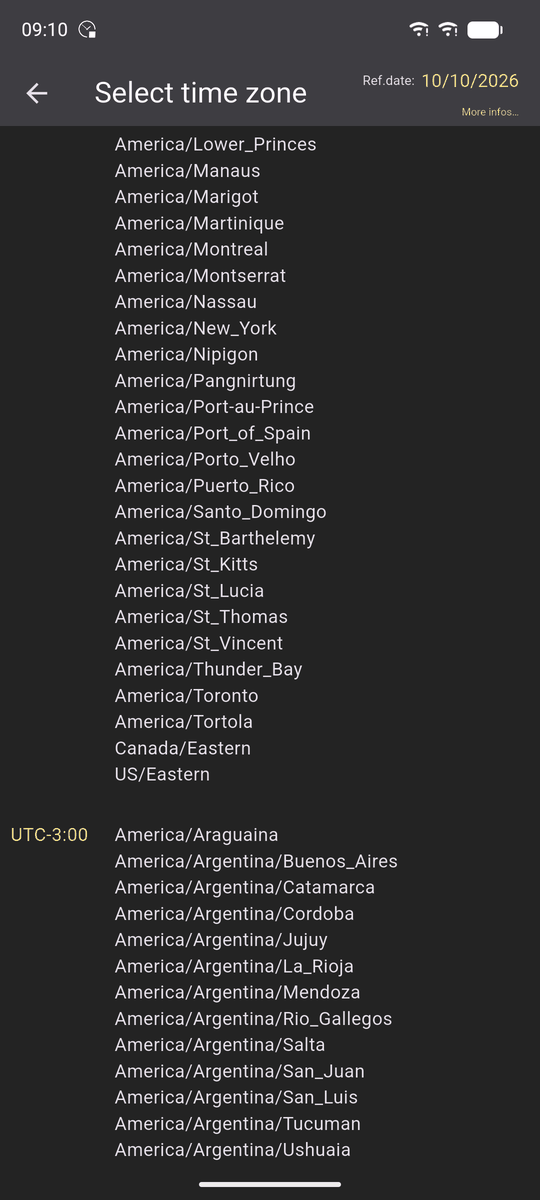
When recording, the app takes the device's time zone by itself. If you add an entry from another zone afterwards, tap the time zone field in the dialog and choose the place. The list is ordered by the offset from UTC; what counts is the date of the entry, because the offset changes with daylight saving time (New York: UTC-5 in winter, UTC-4 in summer).
 Enlarge image
 Enlarge image
The timeline shows the entry at its local time and names the zone in the summary. Calculations still use real time: if the entry overlaps another one because 08:00 in New York is 14:00 in Zurich, the app says so and offers to remove the covered part.
 Enlarge image
The views at a glance
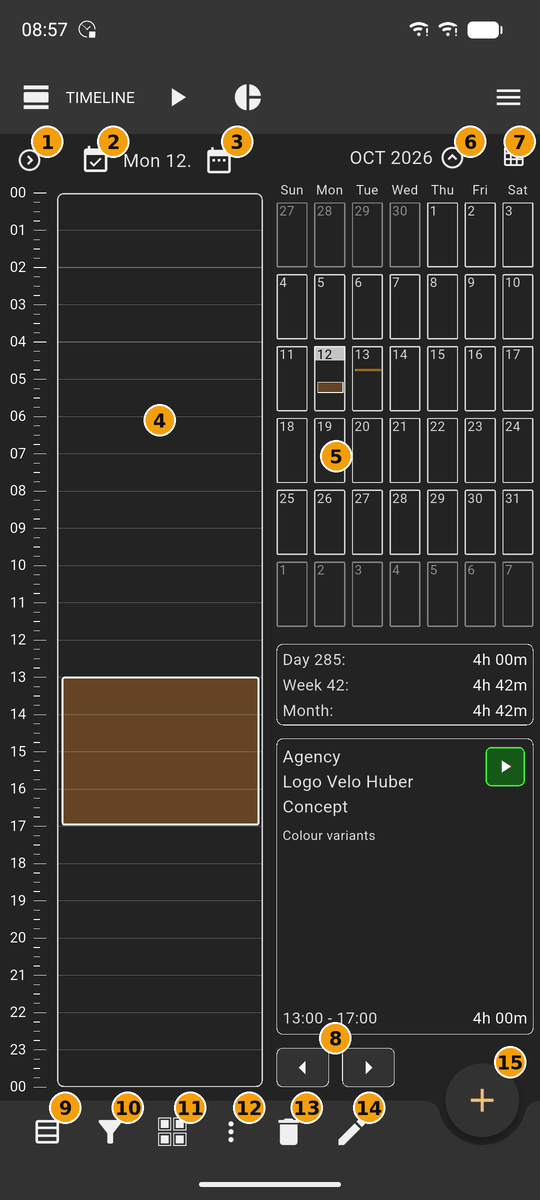
For reference: the controls of the three main views. Switch between them with the icons at the top – TIMELINE, RECORD and REPORT.
Timeline
 Enlarge image
- Day zoom: enlarge the day column (Pro version).
- Jump to today.
- Select date.
- Swiping up or down in the day column changes the day; tapping a block selects the entry.
- Swiping in the month changes the month; tapping a day shows it.
- Expand and collapse the month.
- Change calendar view.
- Select the previous or next entry.
- Table view of the entries.
- Filter entries by text.
- Show entries by elements: all, visible or selected.
- More filters based on the selected entry: element names, details text, domain, project or task.
- Delete the selected entry.
- Edit the selected entry.
- New time entry or insert pause.
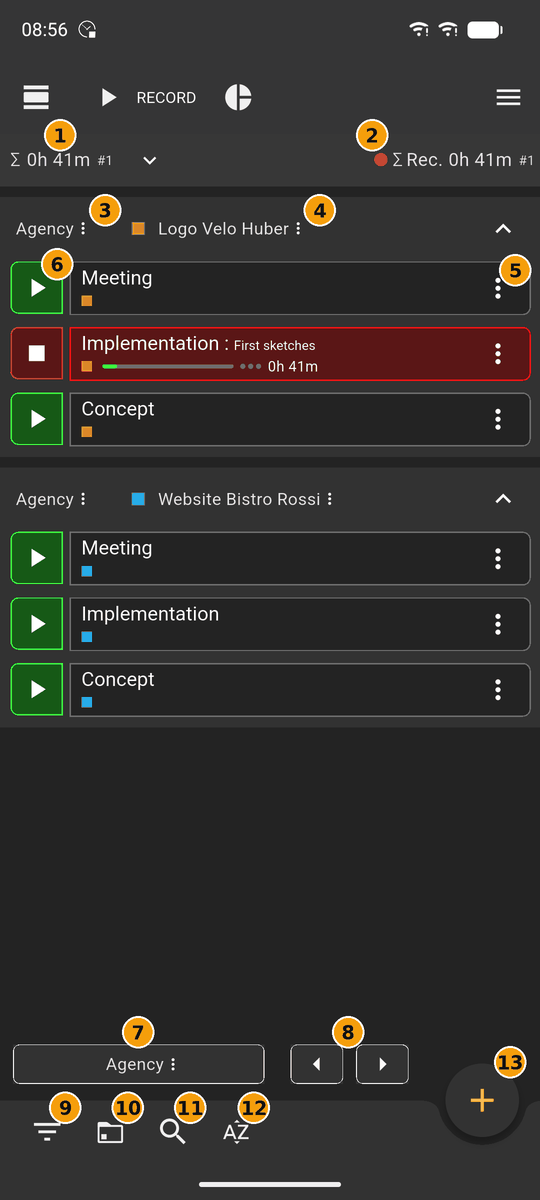
Record
 Enlarge image
- Total of the day; the arrow next to it expands the entries.
- Total of the running recordings.
- Domain menu: edit, add project.
- Project menu: edit, add task.
- Task menu: edit, mark as favourite, deactivate, hide, delete.
- Start and stop recording; press and hold for Start & Edit.
- The domain shown and its menu.
- Switch between domains.
- Show hidden or deactivated projects and tasks.
- View mode: all, favourite or recently used tasks.
- Fast search for tasks.
- Arrange elements.
- New domain, project, task or time entry.
Report
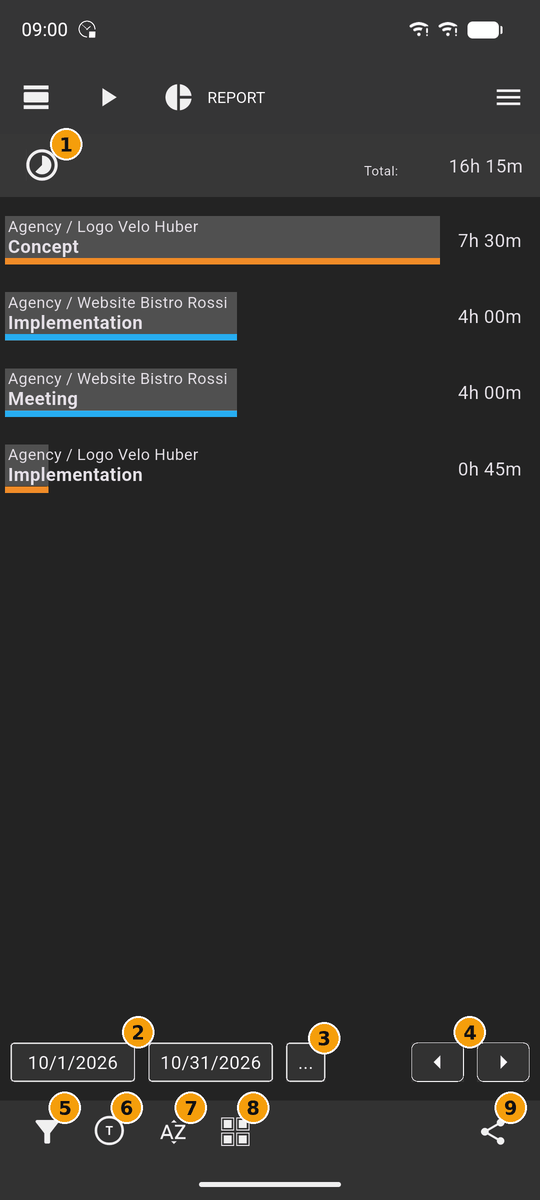 Enlarge image
- Display: hours, percent or number of entries.
- Period from – to.
- Ready-made periods such as This week or Last month.
- One period back or forward.
- Filter entries by text.
- Level: task, project or domain.
- Change sort order.
- Show entries by elements.
- Export and share.
More questions on this topic: FAQ on the app